Beginner computer vision projects
1. Hugging Face model deployment for enhanced vision systems
Skills targeted:
Model deployment, Hugging Face integration, and practical AI skills
Hardware you’ll need:
- Computer (macOS, Linux, or Windows)
- Webcam or compatible camera
Start experimenting with ML applications using Hugging Face’s pre-trained models integrated with Viam's vision services through our registry. By embedding these ML models into your system, you’ll be ready for advanced image analysis and pattern recognition with minimal setup.
After loading and configuring a pre-trained Hugging Face model in Viam, you can apply it to analyze specific visual patterns for your desired use case—like categorizing shoes or detecting hard hats based on trained ML data.
Steps to build:
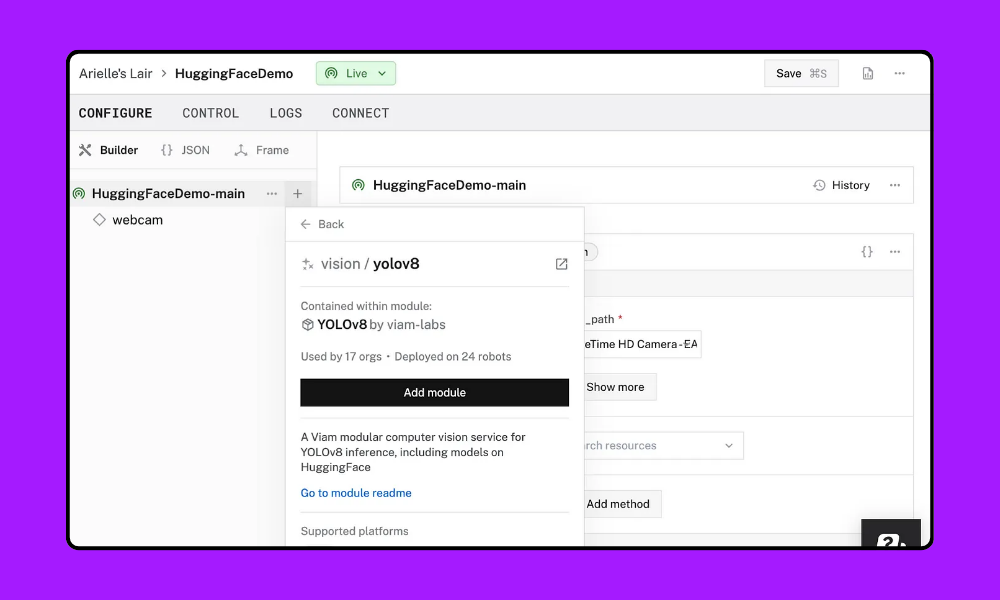
1. Install ‘viam-server’ and add a camera component in the Viam app.
2. Add a YOLO vision service module (choose from YOLOv5 or YOLOv8) from our registry and configure it in your machine’s setup. Use our vision API to start writing script. See the full setup tutorial from Hugging Face.
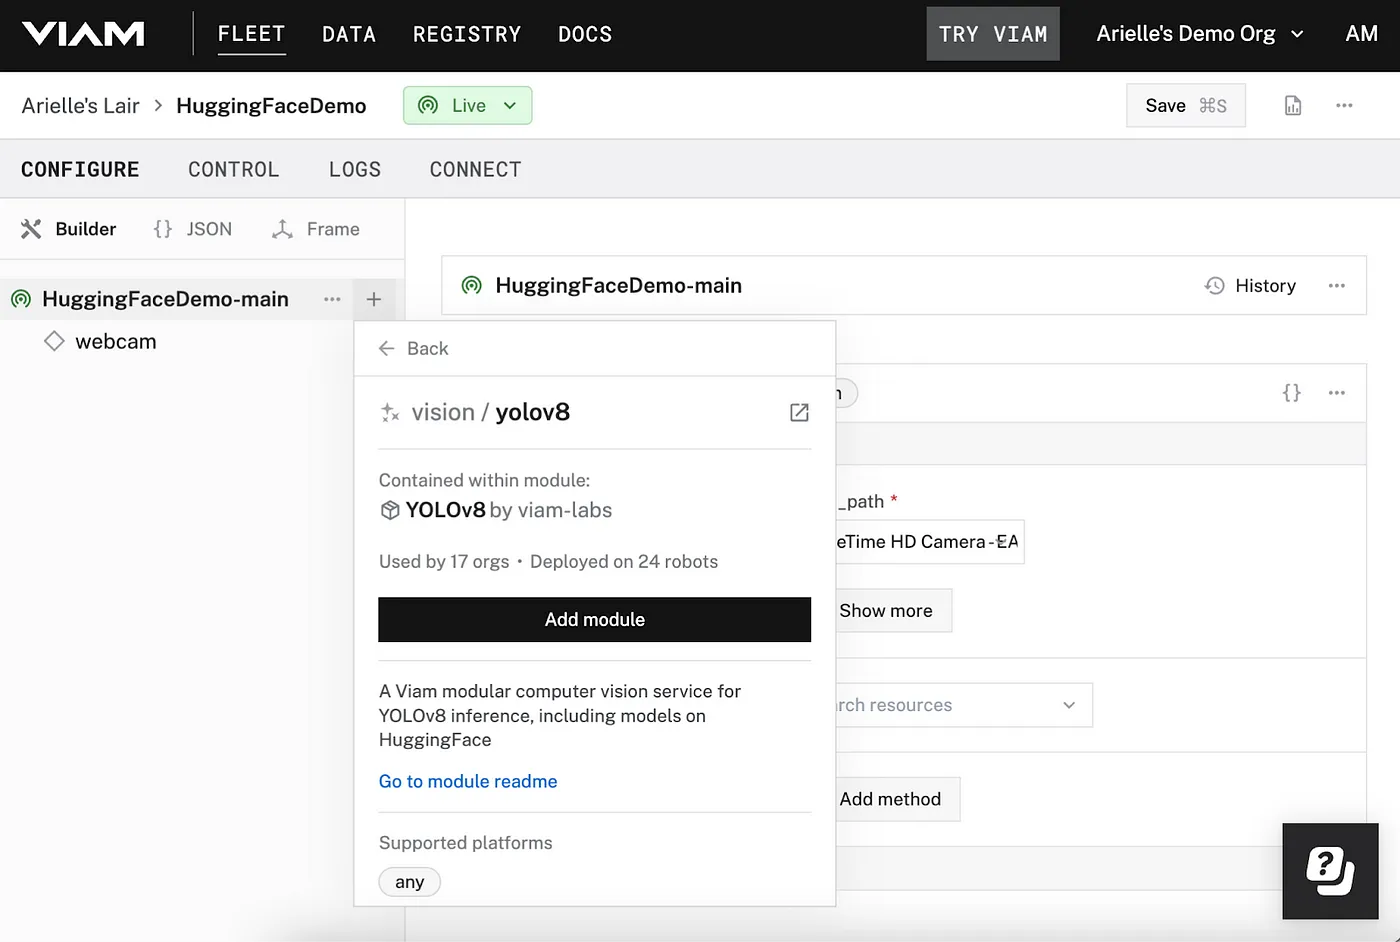
3. Now comes the fun part: choosing a model based on your use case. Select and integrate any compatible Hugging Face YOLO model with the vision service—from categorizing your shoe collection to tracking machines on a construction site.
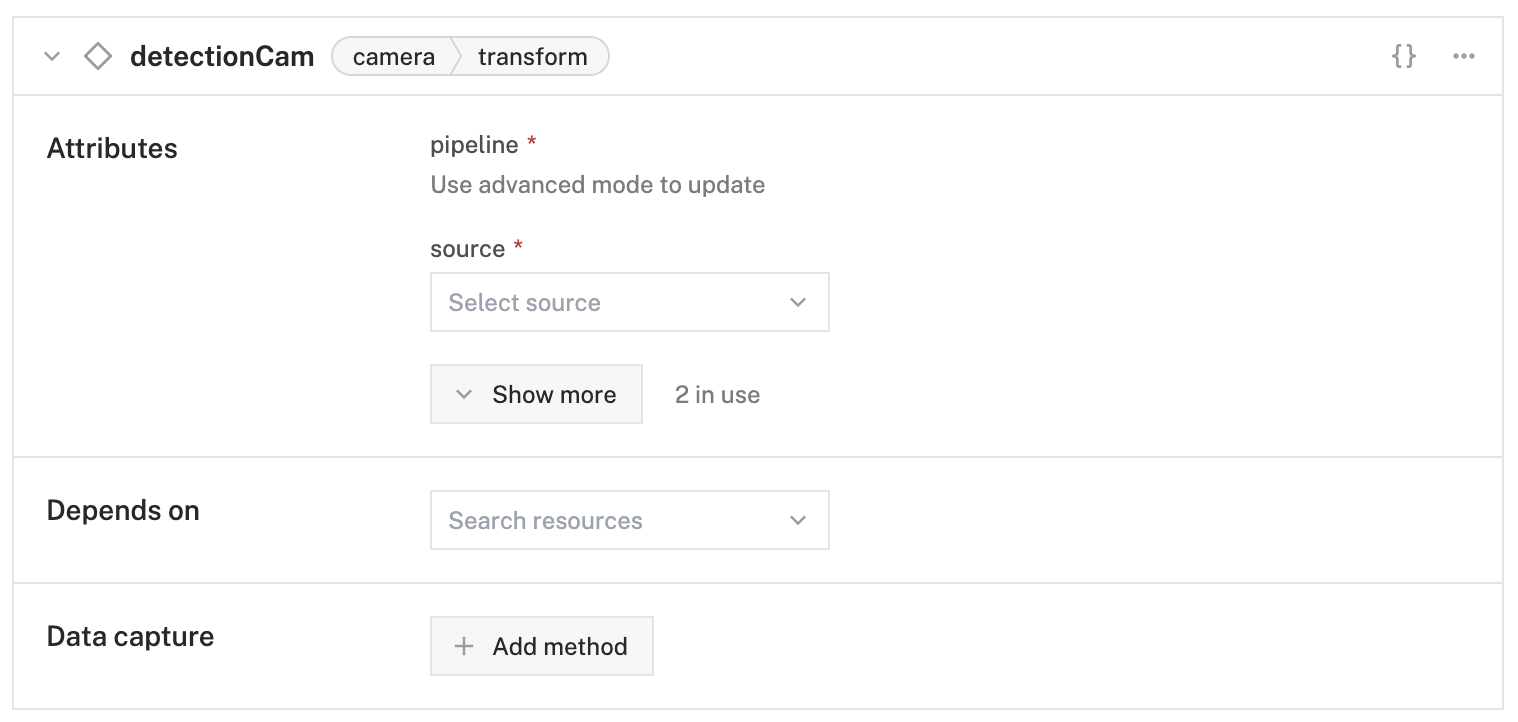
4. With your system set up, you can now test and visualize detections. A good place to start is using Viam's transform camera to display bounding boxes and then verify real-time object detection in the Viam app.
Take your computer vision project a step further:
Once you’ve created your vision system, customize it further using Viam’s APIs and flexible SDKs.
Jump to the full project tutorial for deploying Hugging Face models on Viam
2. Object tracking with a mobile rover (like SCUTTLE)
Skills targeted:
Color detection, robotics integration, and control systems
Hardware you’ll need:
- SCUTTLE robot kit or similar wheeled robot
- Webcam camera
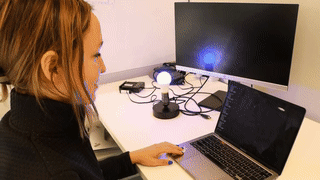
Let’s build a robot with color detection capabilities! Your robot will be able to follow an object of a specific color—whether it’s a red soccer ball like in the video or your chihuahua sporting a bright yellow sweater. This computer vision project is an entertaining, hands-on way to learn object tracking with a robot.
Steps to build:
1. Assemble the SCUTTLE robot kit (or the Viam rover or another mobile rover) and attach and configure the webcam. Make sure the camera is connected to the rover’s board and then turn on power to the rover.
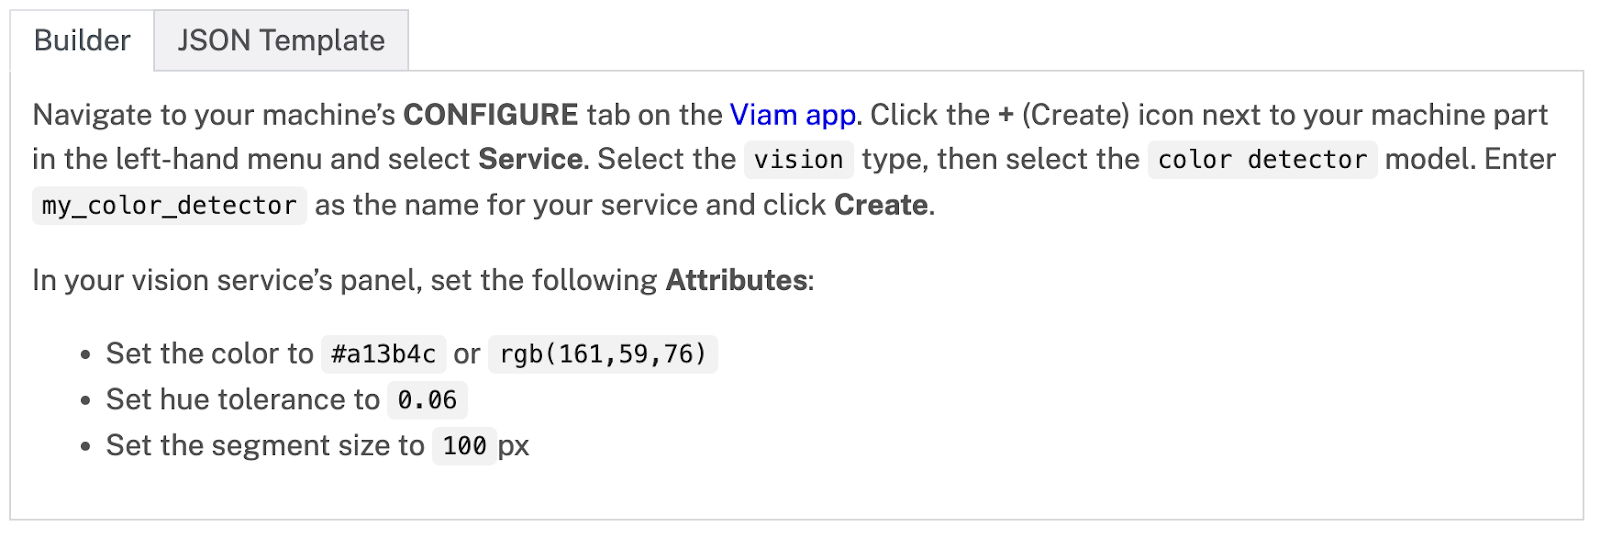
2. Set up the Viam platform on your machine and configure color detection. This example uses #a13b4c, a reddish color, but you can specify any color you like. Here’s a quick overview:
3. The detector will now draw boxes around objects of that color. Now test the detector from the CONTROL tab.
4. It’s time to program your rover for color detection. Set up your code environment using Virtualenv. Now, connect Python code and follow the steps in the tutorial to process the camera feed and detect the specified color.
5. Integrate the color detection results with the robot’s movement controls. Now, run the code again and test whether the rover follows an object of that color. Have fun with it!
Take your computer vision project a step further:
Next, try adding different colors for your rover to detect. You can even use the Viam SDK to train your rover to move in a square.
Jump to the full tutorial for following a colored object.
Intermediate computer vision projects
3. Light automation with object detection
Skills targeted:
Object detection, Python coding, and basic automation
Hardware you’ll need:
- Computer (running macOS or 64-bit Linux) with a webcam
- Viam-compatible hardware like a Kasa smart bulb/plug
- Table lamp
- Mobile phone to connect to smart plug
Have you ever wanted to turn a light on and off when you enter and leave a room, without using a smart lightswitch? This project uses object detection to control a lamp based on whether someone is nearby or not. Using a smart bulb, you’ll set up the light to respond automatically after detecting a person or movement.
This computer vision project involves using a Python object detection library like OpenCV or YOLO to capture live video data and detect objects in a specific area.
Steps to build:
1. Install ‘viam-server’ on your computer and add a new machine in the Viam app. Configure your webcam as an object detection camera. Then test the camera feed in the Control tab.

2. Set up computer vision services and configure the ML model on your machine.
3. Configure a transform camera to test bounding boxes for detected objects.
4. Set up the Kasa smart plug and install the smart plug Python API.
5. Write Python code to control your object detection device using the files in the GitHub repo for this project.
6. It’s time to test it out! Run the code using a command line from your computer.
Now, see how well this computer vision project works by moving in and out of the webcam’s line of sight to see if it detects people accurately. If everything’s configured properly, the system will detect you and trigger the smart plug to switch the lamp on and off.
Take your computer vision project a step further:
Modify the code to detect different types of objects listed in the ‘labels.txt’ file, like your cat or even a vacuum cleaner!
Jump to the full tutorial for automating your lights.
4. Home energy optimization with AI
Skills targeted:
Real-time monitoring, data analysis, and sustainability-focused engineering
Hardware you’ll need:
- ESP32-WROVER microcontroller with a camera (less than $10)
- Cloud server or personal computer to run ‘viam-server’
- SolarEdge inverter (or other compatible energy monitoring system)
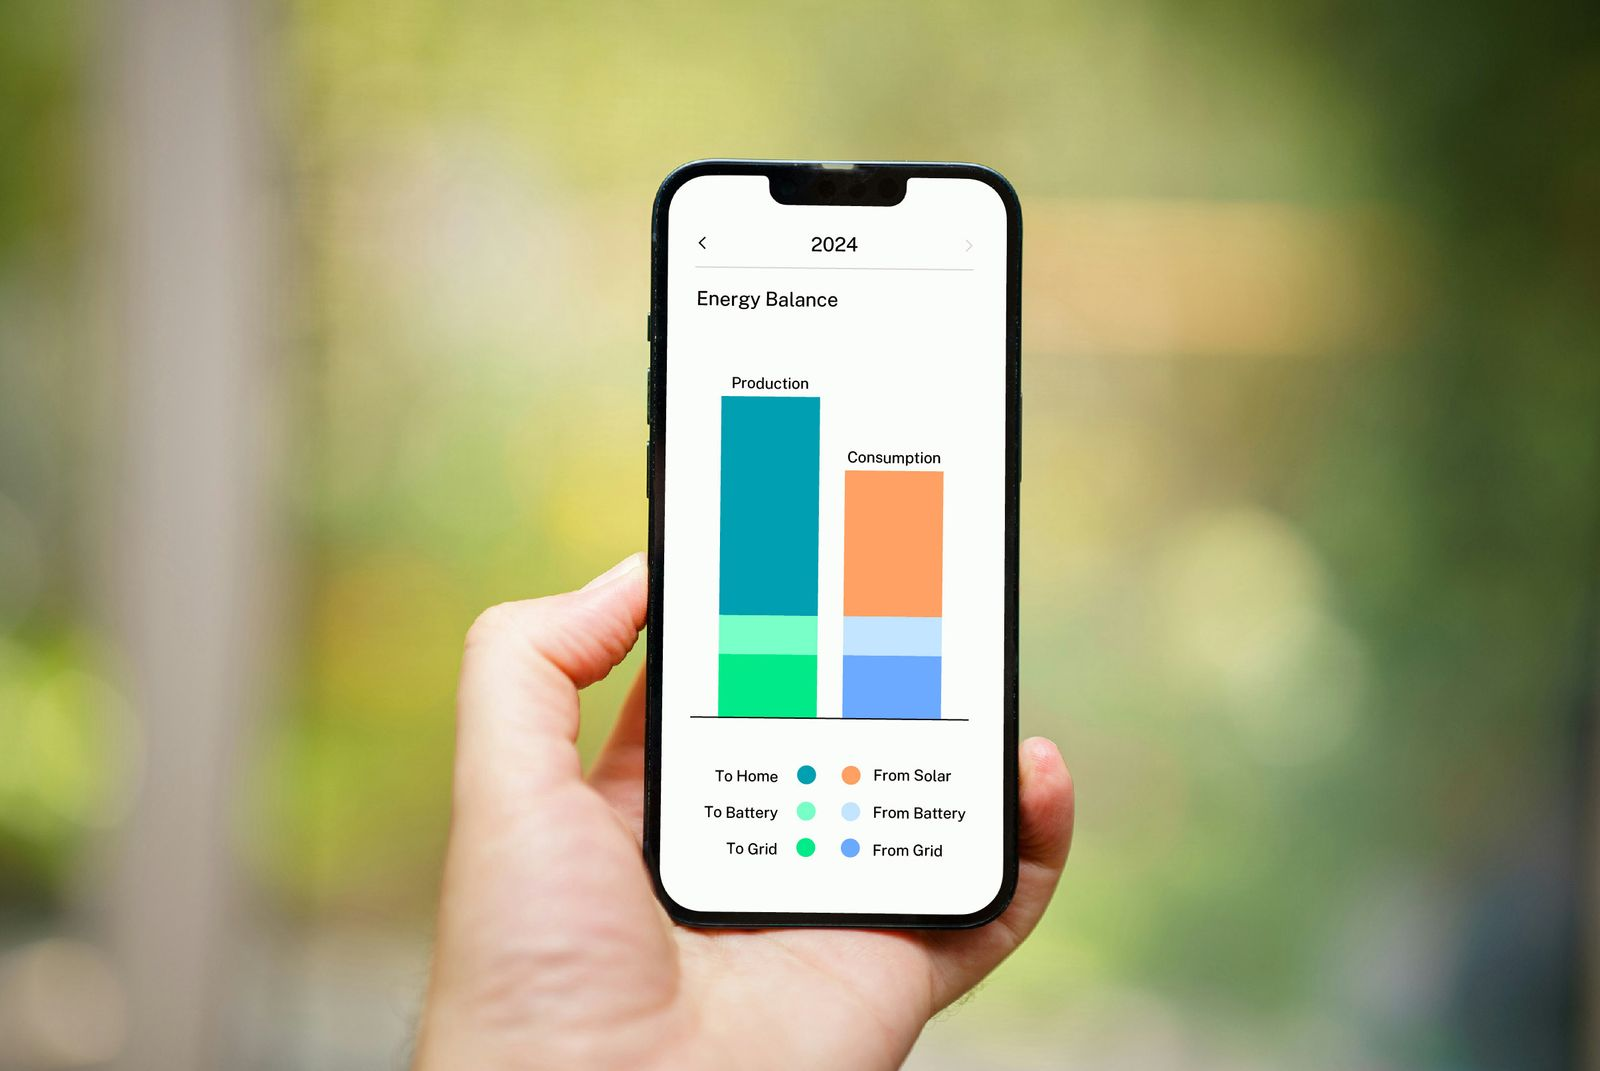
If you’ve ever wondered how energy usage in your house fluctuates based on how many people are home, this computer vision project is for you. Sure, you may already have some smart home technology in place—like thermostats or batteries—but this project takes it to another level by correlating your energy usage data to the presence of people in your house.
With this computer vision project idea, you’ll be able to track when people enter and leave your home so that you can analyze how much energy is consumed based on how many people are in the house.
Steps to build:
1. Set up the ESP32 camera with ‘viam-micro-server.’

2. Configure the cloud server with ‘viam-server.’ Link the ESP32 as a remote part.
3. Set up AI services on ‘viam-server.’ Configure the ML model and computer vision services and then integrate OpenAI's ChatGPT vision module.
4. Implement person detection and energy monitoring. Use Viam Python SDK for detection and then integrate SolarEdge Monitoring API to track energy usage.
5. Now you’re ready to collect and analyze the data! The project creator used ChatGPT to analyze the raw data to extract insights into energy usage patterns, but feel free to use whatever tool you prefer. For data storage, use Viam’s Data Management or a similar service.
Take your computer vision project a step further:
To get a better sense of energy usage in other areas of the house, consider adding more sensors for appliances like lights, your HVAC system, or hot water heater. This data could help you keep track of where lights or heat/AC are being left on, or how much energy is being consumed by long showers.
Jump to the full tutorial for using AI to reduce home energy usage.
5. Helmet detection for job site safety
Skills targeted:
Safety-focused AI, real-time detection, and public safety applications
Hardware you’ll need:
- A computer (running macOS or Linux) or single-board computer (SBC)
- A webcam
This computer vision project takes us to the field of job site safety by automating the process of monitoring workers’ use of personal protective equipment (PPE)—in this case, wearing a hard hat or helmet. By detecting the presence or absence of helmets on people’s heads, this system helps companies enforce safety regulations and prevent accidents on job sites.
For this project, you’ll train object detection models to recognize helmets on workers’ heads. The system will scan live video feeds and then alert supervisors if a worker isn’t wearing a helmet.
Steps to build:
1. Connect your webcam to your computer and install the Viam server on your device. Then test your camera to make sure the video feed displays correctly.
2. Set up Viam's vision service and add the YOLOv8 module, then configure the hard hat detection model from Hugging Face.
3. Configure the ‘objectfilter’ module to process the camera feed and detect people with and without hard hats. Now test the detector to make sure it can detect people with hard hats and without hard hats.
4. Now, set up Viam’s data management features for data capture to upload images of people without hard hats to the cloud so you can see which workers aren’t wearing helmets.
5. The final step is to create a notification system. Write a serverless function to send email notifications each time the system detects a worker who isn’t wearing a hard hat. Make sure to test the whole system once all triggers are set up.
Take your computer vision project a step further:
Once you’re comfortable with this system, you can integrate it with mobile robots to more effectively monitor helmet usage throughout the job site.
Jump to the full tutorial for monitoring job site helmet usage.
6. Custom facial verification system
Skills targeted:
Facial recognition, security protocols, and model training
Hardware you’ll need:
- A computer
- Webcam
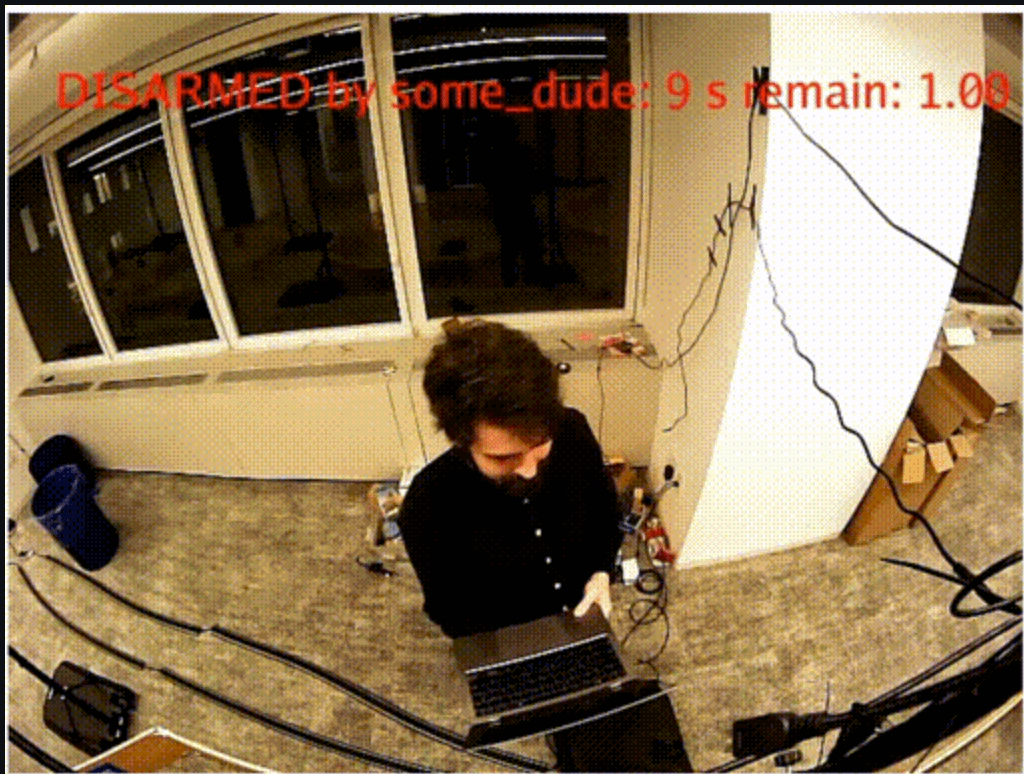
Learn how to create a facial verification system and create a simple and practical security solution for your home or office. You’ll learn two ML models for this project: facial detection and person recognition, and then train the facial detection models on facial images of actual people.
By comparing live facial data with stored images, your system will authenticate individuals and grant or deny “access” through an alarm system.
Steps to build:
1. Connect your webcam to your computer and install ‘viamserver.’ Configure the camera component in the Viam app.
2. Configure the ML model service. Then set up two vision detectors—a people detection model and a facial recognition model. Use the Viam app to add these services and configure their attributes.
3. Now you’ll add the module that can detect specific faces and arm or disarm the alarm based on that data. Add the verification system module to your machine and configure it to use the two vision detectors.
4. Finally, create the visual overlay by configuring a transform camera to display the current state of the verification system on your live camera feed. Now, you can see the system in action as it detects people.
Take your computer vision project a step further:
The project creator recommends using this system as a starting point to create your own DIY home security system.
Jump to the full tutorial for creating a facial verification system.