

When I started at Viam, Eliot Horowitz told me the best way to test the product is to try to automate something I do in my life with a robot. As a parent of a 3-year-old and a 1-year-old, I am often presented with a toy and asked to sing a song about it. When I was testing out Viam’s ML Model service, I came up with the idea of using machine learning to make my computer do this instead.
You can follow this tutorial to train your own machine learning model to make your own “bedtime songs bot” out of a personal computer.
Get started
To make your own singing robot, you need the following hardware:
- A computer with a webcam, speakers, and the Go Client SDK installed. I used a Macbook, but you can use any PC with a Viam-compatible operating system that meets the above requirements.
Train your ML model with pictures of toys
Configure your webcam to capture data
In the Viam app, add a new machine and follow the setup instructions to install viam-server on your computer and connect to the Viam app.
Once connected, navigate to your machine’s page in the app and click on the CONFIGURE tab.
First, add your personal computer’s webcam to your robot as a camera by creating a new component with type camera and model webcam:
Click the + icon next to your machine part in the left-hand menu and select Component. Select the camera type, then select the webcam model. Enter cam as the name or use the suggested name for your camera and click Create.
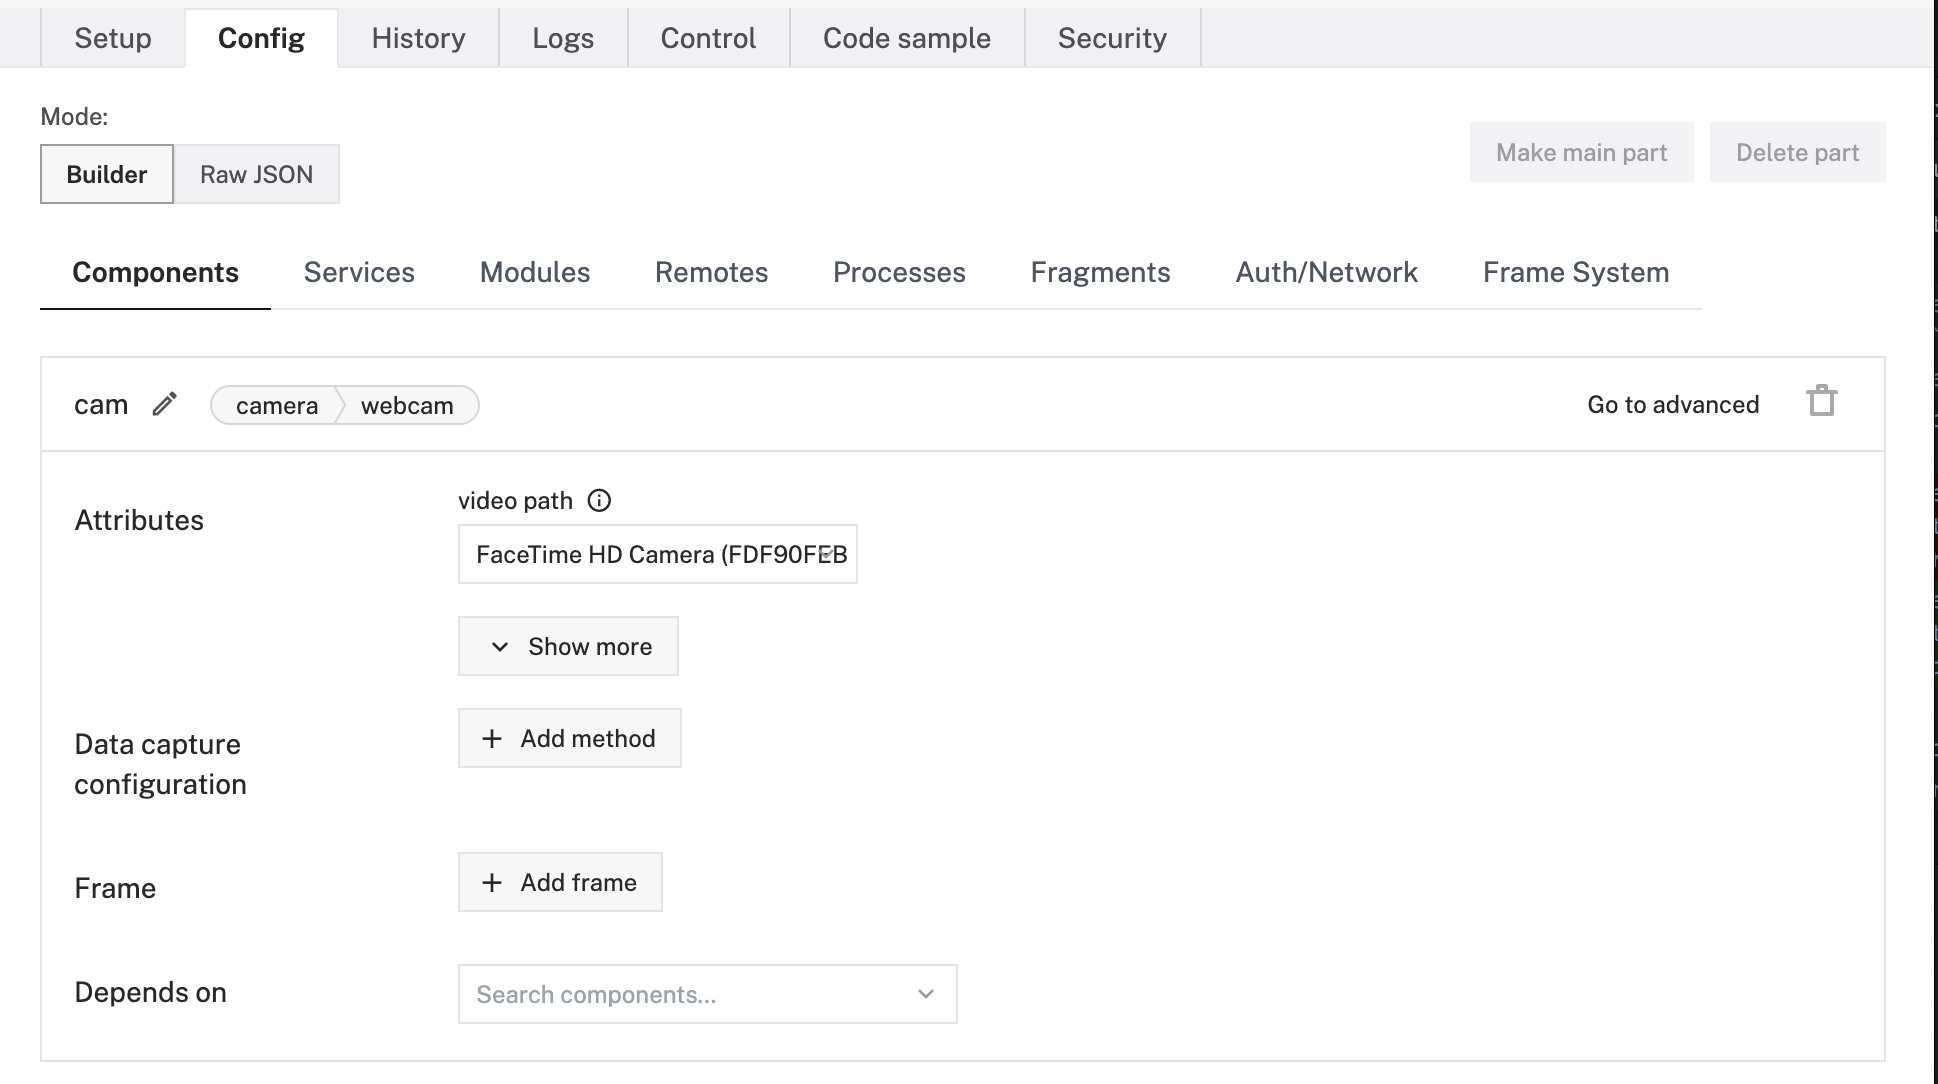
In the configuration panel, click the video path field. If your robot is connected to the Viam app, you will see a dropdown populated with available camera names.
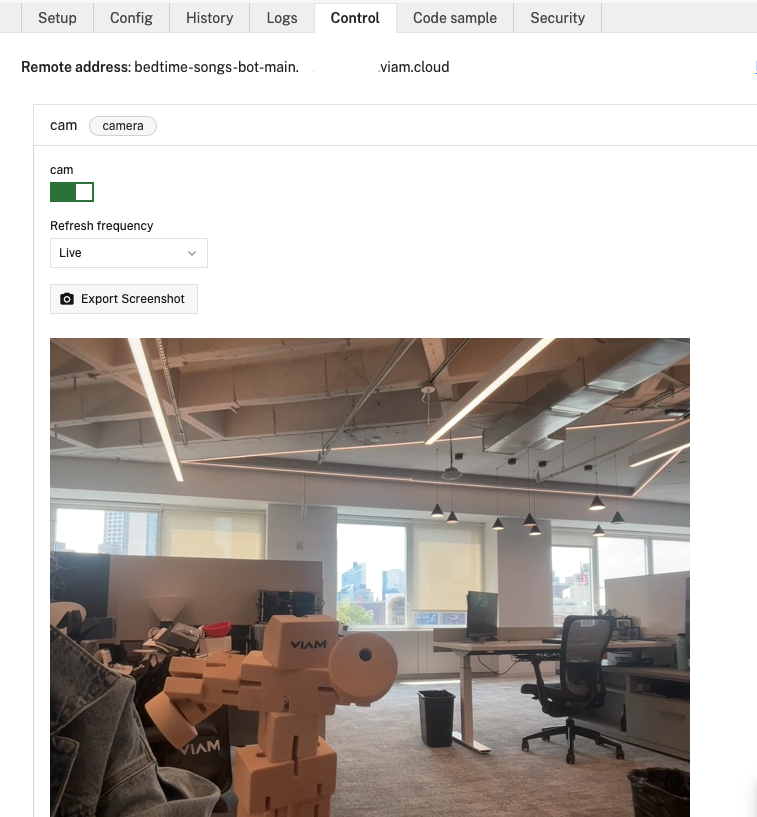
Select the camera you want to use. If you are unsure which camera to select, select one, save the configuration, and go to the Control tab to confirm you can see the expected video stream. On the Control tab, click on the dropdown menu labeled camera and toggle the feed on. If you want to test your webcam’s image capture, you can click on Export screenshot to capture an image, as shown below:
Now, configure the Data Management Service to capture data, so you can use the image data coming from your camera on your robot to train your ML model:
- Click the + icon next to your machine part in the left-hand menu and select Service.
- Select the Data Management type, then either use the suggested name or specify a name for your data management service, for example data-manager.
- Click Create.
- Make sure both Data Capture and Cloud Sync are enabled as shown:
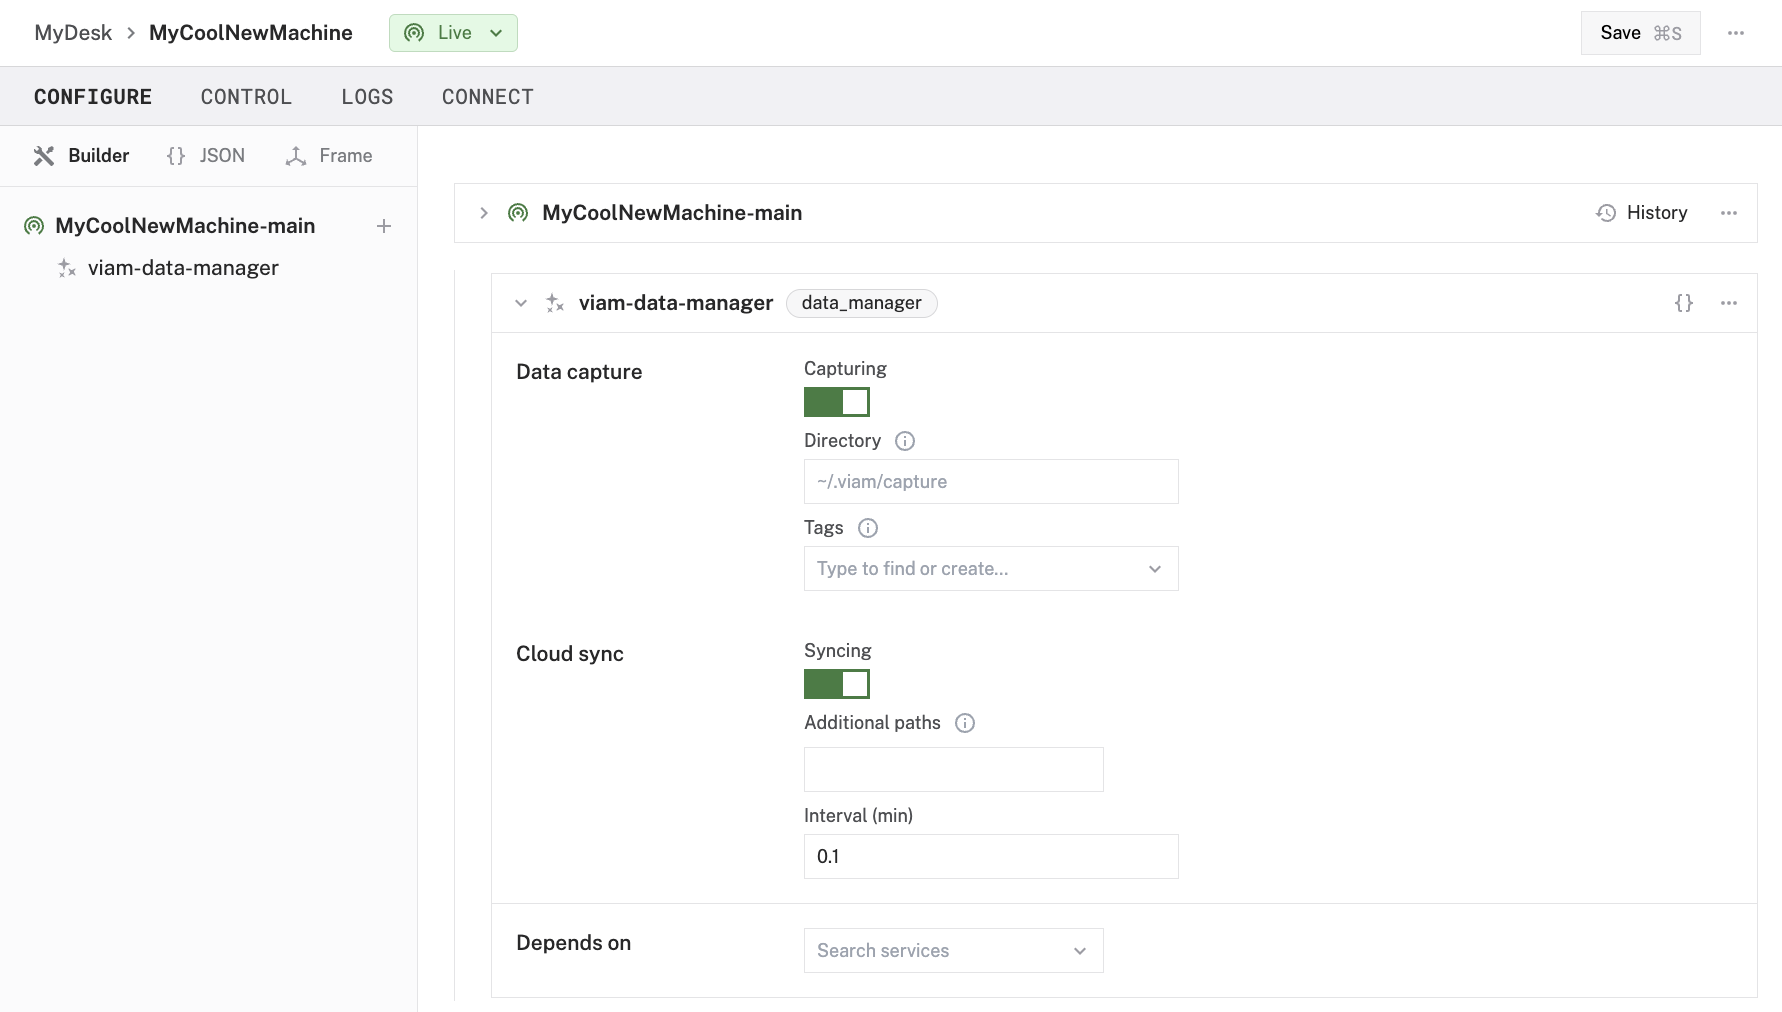
Enabling data capture and cloud sync lets you capture images from your webcam, sync them to the cloud and, in the Viam app, easily tag them and train your own machine learning model.
You can leave the default directory as is. By default, captured data is saved to the ~/.viam/capture directory on-robot.
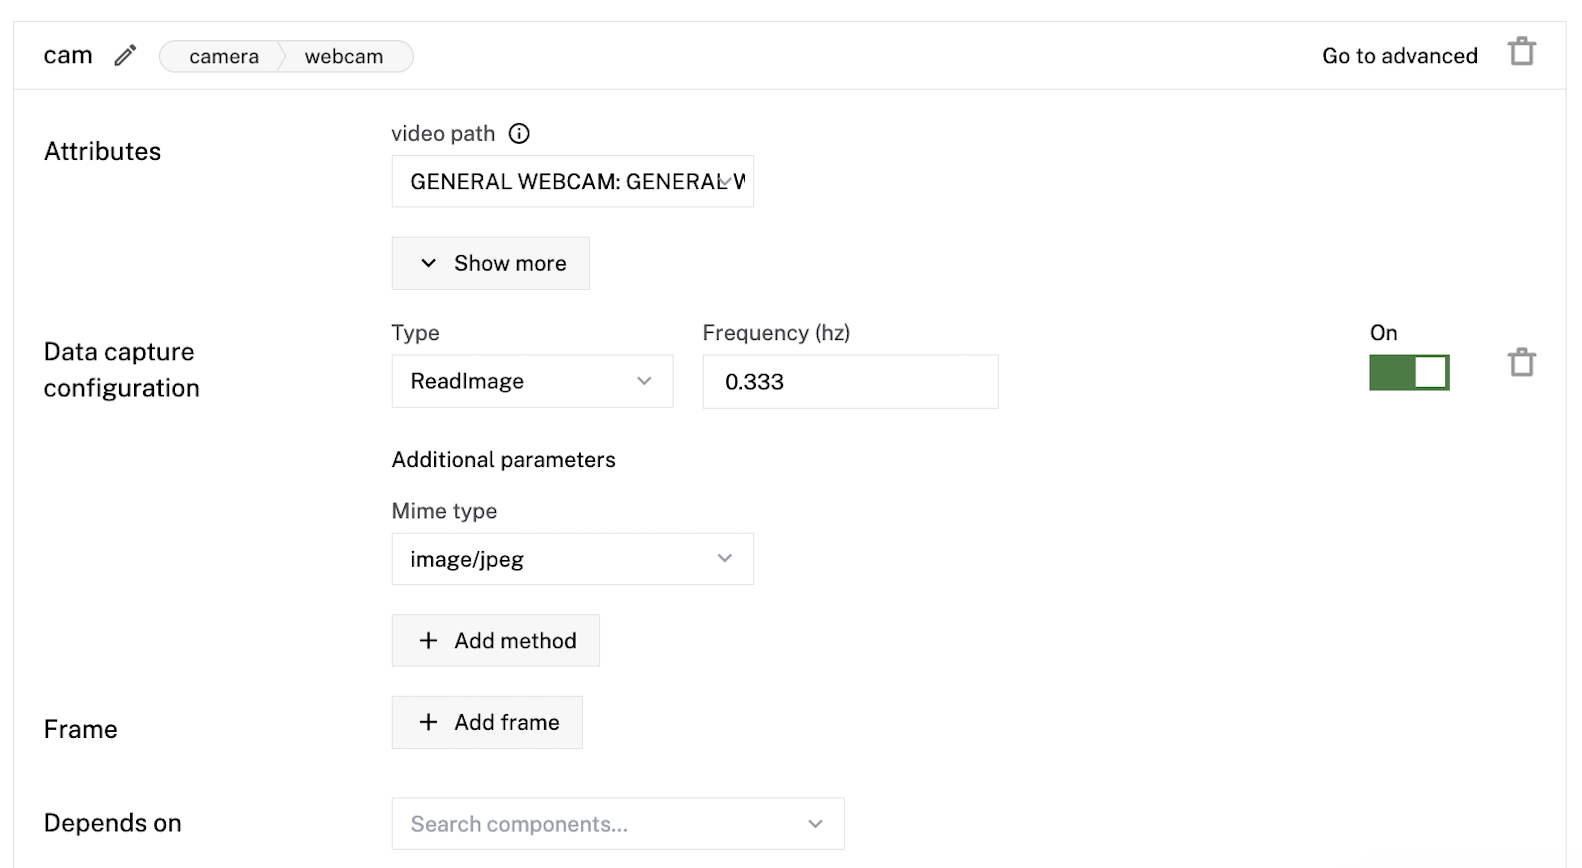
Next, configure Data Capture for your webcam:
- Find the camera component panel from the camera you previously configured.
- Click + Add method in the Data Capture Configuration section.
- Set the Type to ReadImage and the Frequency to 0.333. This will capture an image from the camera roughly once every 3 seconds. Feel free to adjust the frequency if you want the camera to capture more or less image data. You want to capture data quickly so your classifier model can be very accurate.
- Select the Mime Type as image/jpeg:
Capture data
Your webcam is now configured to automatically capture images when you are connected to your robot live on the Viam app. At this point, grab the toys or any objects you want the robot to be able to differentiate between.
My kids like playing with puzzle pieces, which come in different shapes and color combinations. So I decided to filter between these puzzle pieces by tagging by shape, but you can filter your objects as you choose.
Hold up the toys to the camera while photos are being taken. Try to capture images from different angles and backgrounds. Try to get at least 50 images that fit your criteria for each tag.
You set the rate of capture in your webcam’s service configuration attribute capture_frequency_hz. If you set this to .333, the data management service will capture 1 image roughly every 3 seconds as you hold up your toys to the camera.
Go to the DATA tab in the Viam app to see the images captured by your webcam.
When you’ve captured enough images to tag, navigate back to the Config tab. Scroll to the card with the name of your webcam and click the power switch next to the Data Capture Configuration to off to disable data capture.
Now, use these pictures to train your machine learning model.
Tag data
Head over to the DATA page and select an image captured from your robot. After selecting the image, you will see all of the data that is associated with that image.
Add tags for each of the puzzle pieces. Type in your desired tag in the Tags section and save the tag. Since I wanted to classify their toys by shape, I used “octagon”, “circle”, “triangle”, “oval", “rectangle”, “pentagon”, “diamond”, and “square”.
Scroll between your images. Add tags for each image that shows an object of the corresponding shape. You can select tags from the Recently used dropdown menu. Try to have at least 50 images labeled for each tag. This is important for the next step.
Train a model
After tagging and filtering your images, begin training your model.
Click the Train Model button. Name your model "shape-classifier-model". If you use a different name, adapt the code in the later steps of this tutorial to use the name you give your model. Select Multi label as the model type, which accounts for multiple tags.
Then select the tags that you used to label your toys and click Train Model.
Read through our guide to training a new model for more information.
Use your ML Model to sing songs to your kids
Configure your webcam to act as a shape classifier
Deploy the model to the robot and configure a vision service classifier of model mlmodel to use the model you’ve trained to classify objects in your robot’s field of vision.
Name your mlmodel vision service "shape-classifier". If you use a different name, adapt the code in the later steps of this tutorial to use the name you give your service.
At this point, the full Raw JSON configuration of your robot should look like the following:
Record bedtime songs
Now, capture the audio of the songs you want your bot to play.
- Record or download the audio files you want to use to your computer in .mp3 format.
- Make the names of the files match the classifier tags you used: for example, square.mp3.
- Navigate to a directory where you want to store your SDK code. Save your audio files inside of this directory.
The audio files I used are available to download on GitHub.
Program your bedtime-songs bot
Now, use Viam’s Go SDK to program your robot so that if your webcam “sees” (captures image data containing) a toy, the robot knows to play a particular song through its computer’s speakers.
Follow these instructions to start working on your Go control code:
- Navigate to your machine’s page in the Viam app, and click on the CONNECT tab.
- Select Go as the language.
- Click Copy to copy the generated code sample, which establishes a connection with your robot when run.
API KEY AND API KEY ID: By default, the sample code does not include your machine API key and API key ID. We strongly recommend that you add your API key and API key ID as an environment variable and import this variable into your development environment as needed. To show your machine’s API key and API key ID in the sample code, toggle Include secret on the CONNECT tab’s Code sample page.
CAUTION: Do not share your API key or machine address publicly. Sharing this information could compromise your system security by allowing unauthorized access to your machine, or to the computer running your machine.
- Open your terminal. Navigate to the directory where you want to store your code. Paste this code sample into a new file named play-songs.go, and save it.
For example, run the following commands on your Macbook to create and open the file:
Now, you can add code into play-songs.go to write the logic that defines your bedtime songs bot.
To start, add in the code that initializes your speaker and plays the songs. I used the platform-flexible Go package and an audio processing package from GitHub to do this.
Modify the above code as you desire.
Make sure you import the necessary packages by adding the following to the import statement of your program:
Also, make sure that you add initSpeaker(logger), a line that initializes the speaker, to the main function of your program.
Now, create the logic for the classifiers. Use the vision service’s classification API method ClassificationsFromCamera to do this.
You can get your components from the robot like this:
And you can get the classification the "shape-classifier-model" behind "shape-classifier" computes for your robot like this:
Change the name from in FromRobot() if you used a different name for the resource in your code.
This is what I used for the logic for the classifiers:
After completing these instructions, your program play-songs.go should look like the following:
Save your play-songs.go program with this logic added in. Run the code on your personal computer as follows:
The full example source code for play-songs.go is available on GitHub.
Now, as shown below, your smart bedtime songs bot knows to play a song whenever it sees a shape on the camera:
Next steps
This project is just a start. You can expand upon the configuration of your bedtime-songs bot to further customize a robot that can entertain with machine learning, the vision service, and more components and services.
Have questions, or want to meet other people working on robots? Join our Community Discord.